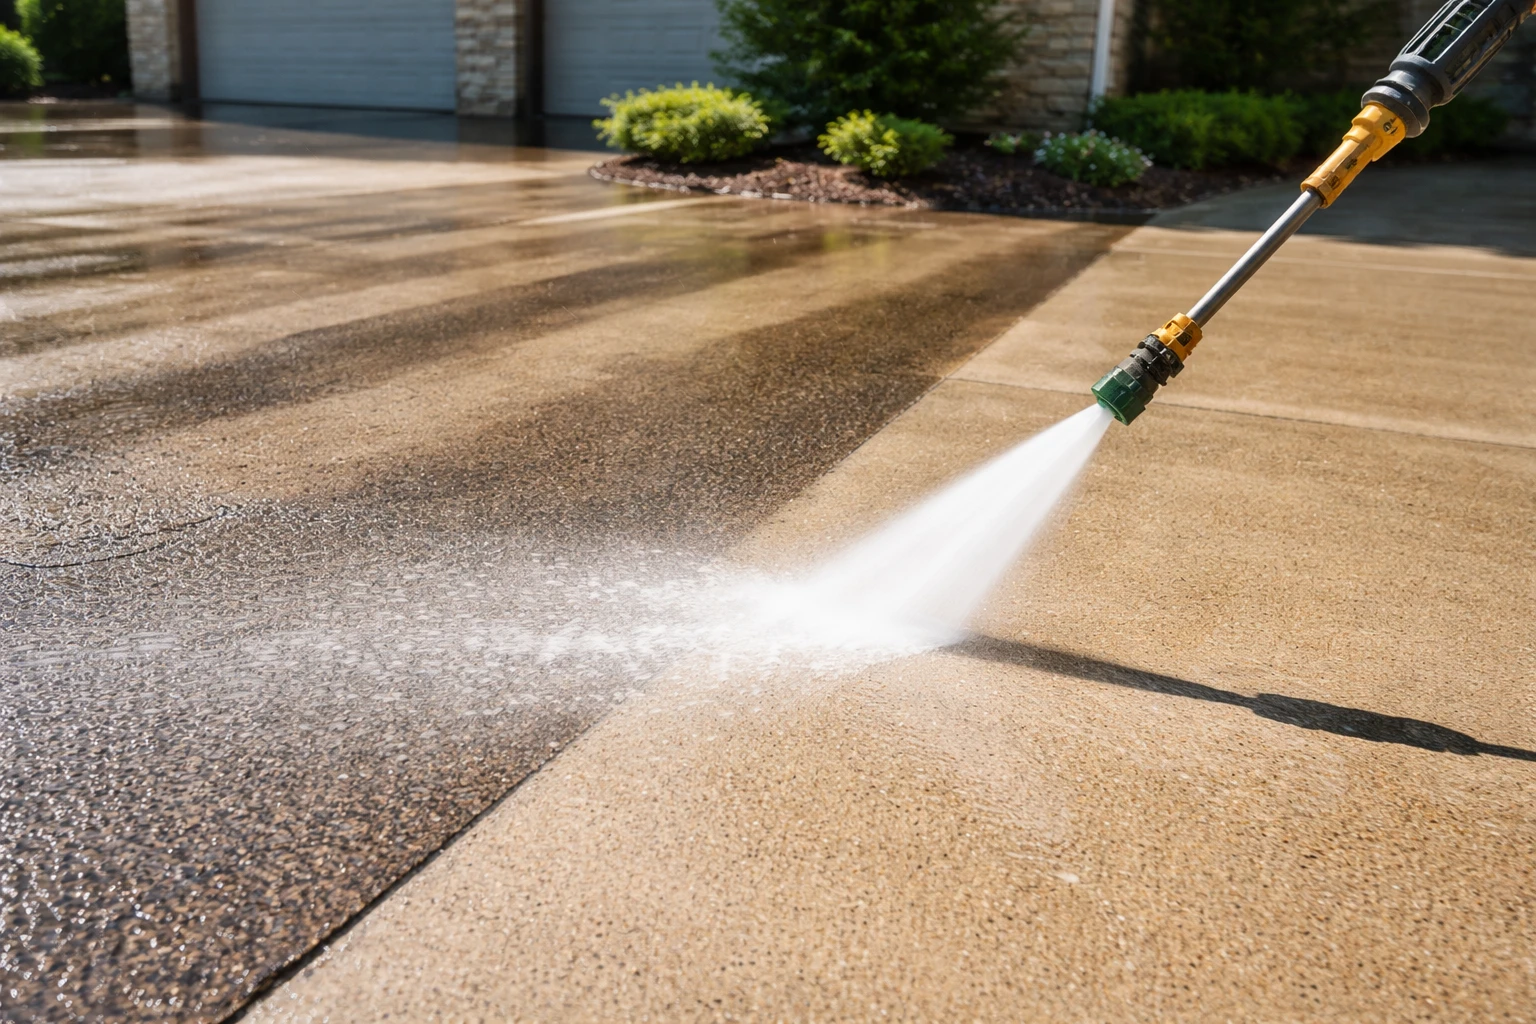
You fire up the machine. You spend two solid hours blasting your driveway. It looks incredible while it’s wet. Then it dries – and there they are. Long, uneven, zebra-like streaks running across the slab.
Why DIY pressure washing leaves “tiger stripes” on concrete isn’t a mystery. It’s physics, technique, chemistry, and equipment limitations colliding in plain sight. And once you understand the mechanics behind it, the frustration makes sense.
I’ve seen this countless times. A homeowner tries to save money. They rent a machine or buy a big-box pressure washer. They follow a few online tips. Then they step back and realize their driveway now looks worse than before. At that point, many start searching for a professional – sometimes even a reputable pressure washing company in Nashville, TN or their local area – just to undo what happened.
Let’s break down exactly why those stripes show up.
What Are “Tiger Stripes” on Concrete?
“Tiger stripes” are uneven streaks left behind after pressure washing. They appear as alternating light and dark bands across the surface. Sometimes they’re subtle. Other times they’re glaring.
You’ll usually see them on:
- Driveways
- Sidewalks
- Patios
- Pool decks
- Garage floors
They’re especially noticeable on older concrete. Why? Because older slabs have absorbed years of dirt, oil, algae, and organic debris below the surface.
And here’s the key: tiger stripes aren’t just dirt you missed. Sometimes they’re areas that were cleaned more aggressively than others. That’s a huge difference.
Concrete Isn’t Smooth – Even If It Looks Like It
At a glance, concrete looks flat and uniform. It isn’t.
Concrete is porous. It’s full of microscopic capillaries and air pockets. Dirt doesn’t just sit on top. It settles in. Oil soaks in. Organic growth bonds with the surface.
Now imagine running a high-pressure stream across that uneven structure.
Some areas respond differently. Some clean faster. And some resist. If your pressure or technique varies even slightly, the difference shows.
And it shows in lines.
The Science Behind Striping
Let’s simplify this.
Pressure washers rely on two main variables:
- PSI (pounds per square inch) – The force of the spray
- GPM (gallons per minute) – The volume of water flowing
Most consumer-grade machines have decent PSI but low GPM. That means they blast hard but don’t rinse deeply. So you end up cutting through dirt unevenly instead of flushing it consistently.
Professionals prioritize GPM for uniform cleaning. DIY setups rarely do.
That imbalance is one reason why DIY pressure washing leaves “tiger stripes” on concrete.”
The #1 Cause: Inconsistent Wand Technique
This is where most striping begins.
1. Distance From the Surface
Too close? You etch the concrete.
Too far? You barely clean it.
The sweet spot is typically 8–12 inches from the surface, depending on the tip and PSI. But most homeowners constantly vary that distance without realizing it.
Every inch matters.
2. Speed of Movement
Move too slowly and you over-clean one area.
Move too fast and dirt remains.
Even small pauses create visible bands. You may think you’re moving consistently. You probably aren’t.
Pressure washing demands rhythm. It’s almost mechanical.
3. Overlap Errors
Professional cleaners overlap each pass by about 30–50%. DIY users often overlap randomly. That inconsistency creates darker and lighter lanes.
And once the slab dries? The contrast becomes obvious.
Nozzle Selection Makes or Breaks the Job
Not all spray tips are equal.
Here’s a quick reference:
| Nozzle Color | Spray Angle | Risk Level |
| Red | 0° | Extremely aggressive |
| Yellow | 15° | High risk of striping |
| Green | 25° | Common for concrete |
| White | 40° | Gentle rinse |
Using a 15-degree tip on concrete without experience? That’s almost guaranteed striping. Narrow spray patterns concentrate force. Any variation in movement leaves marks.
Wider spray patterns reduce risk but require better technique.
The Equipment Gap
Let’s be honest. Most DIY machines are underpowered in the wrong ways.
Consumer-Grade Limitations:
- Lower GPM output
- Inconsistent pump flow
- Pulsing pressure
- Short wands limiting ergonomic movement
That pulsing alone can create uneven cleaning patterns.
Professionals typically use:
- 4–8 GPM commercial machines
- Surface cleaners with rotating dual nozzles
- Calibrated chemical application systems
The difference isn’t subtle.
Why Surface Cleaners Matter
If you’ve ever watched a professional clean a driveway, you’ve probably seen a circular attachment gliding over the slab. That’s a surface cleaner.
Inside that housing are two rotating nozzles spinning rapidly. Instead of a single stream creating lines, the rotation creates uniform coverage.
It dramatically reduces the risk of striping.
Using only a wand is the most common reason why DIY pressure washing leaves “tiger stripes” on concrete.” The tool itself is working against you.
Skipping Pre-Treatment: A Major Mistake
This is where most DIY attempts go wrong.
Pressure alone doesn’t clean. It agitates.
Real cleaning happens when you:
- Apply a proper detergent
- Let it dwell
- Then rinse
Organic stains, algae, and mildew need chemical breakdown before rinsing. Without pre-treatment, you’re relying entirely on mechanical force.
That’s when you overcompensate.
You get closer. You slow down. You blast harder.
And that uneven aggression shows up as stripes.
Water Temperature Changes Everything
Cold water machines dominate the consumer market.
But oil and grease respond far better to heat. Without hot water, you may partially lift stains rather than fully removing them. That creates subtle color variations across the slab.
It looks like striping.
It’s actually uneven stain removal.
Common DIY Errors That Create Striping
Let’s make this practical.
Here are the biggest mistakes homeowners make:
- Cleaning in direct sunlight (surface dries too fast)
- Starting and stopping in the middle of visible areas
- Spot-cleaning only dark stains
- Using too narrow of a nozzle
- Holding the wand at inconsistent angles
- Ignoring surface slope and runoff patterns
Each one contributes to visible banding.
And once you see stripes, you can’t unsee them.
When Tiger Stripes Are Actually Damage
Sometimes the issue isn’t dirt. It’s surface damage.
Etching
If you hold a high-pressure tip too close, you remove the top “cream” layer of concrete. That permanently changes texture and color.
Those lines don’t wash away.
They’re scars.
Aggregate Exposure
Overwashing can expose small stones within the concrete mix. That changes reflectivity. The contrast appears as streaks.
Again, not dirt. Damage.
Sealant Stripping
If the driveway was previously sealed, uneven pressure may remove sealer in bands. That creates sheen differences.
It looks like tiger stripes.
It’s actually uneven coating removal.
Why It Looks Worse After It Dries
This is psychological and chemical.
Wet concrete hides inconsistencies because everything reflects light evenly. As it dries, the contrast sharpens.
Areas cleaned more aggressively appear lighter. Areas cleaned less remain darker.
That delayed reveal is why many homeowners think the job looked fine at first.
Then it dries. And disappointment sets in.
Can Tiger Stripes Be Fixed?
Sometimes.
Option 1: Reclean the Entire Surface
Spot correction rarely works. You must clean the entire slab uniformly to balance appearance.
That means consistent technique and possibly professional equipment.
Option 2: Use a Surface Cleaner
Switching from a wand to a rotary surface cleaner can help even out lighter striping – if damage hasn’t occurred.
Option 3: Chemical Treatment
For organic discoloration, applying:
- Degreasers
- Algae treatments
- Mild acid-based cleaners (with caution)
can sometimes restore uniformity.
Improper acid use, however, can make things worse. Much worse.
Option 4: Resurfacing
In severe etching cases, resurfacing may be the only solution.
That’s the expensive route.
Prevention: How to Avoid Striping Altogether
If you’re determined to DIY, here’s how to reduce risk.
Use the Right Setup
- Choose at least a 25° nozzle
- Maintain consistent 8–12 inch distance
- Overlap passes by 30–50%
- Avoid pausing mid-pass
Always Pre-Treat
- Apply a concrete-safe detergent
- Allow proper dwell time
- Rinse evenly
Work in Sections
Clean in manageable 4×4 or 6×6 sections to maintain consistency.
Test First
Always test in an inconspicuous corner before committing to the full slab.
DIY vs Professional: A Real Comparison
| Factor | DIY Setup | Professional Setup |
| GPM | 2–3 | 4–8 |
| Surface Cleaner | Rare | Standard |
| Chemical Knowledge | Limited | Trained |
| Risk of Striping | High | Low |
| Uniform Finish | Inconsistent | Controlled |
The biggest difference? Uniformity.
Professionals prioritize even results over speed. That’s why you rarely see striping when experienced crews handle the job.
Why DIY Pressure Washing Leaves “Tiger Stripes” on Concrete – The Real Answer
It’s not just one thing.
It’s:
- Inconsistent movement
- Equipment limitations
- Skipped chemical steps
- Surface variability
- Over-reliance on pressure
- Poor overlap technique
When those combine, the outcome is predictable.
Striping isn’t random. It’s mechanical.
And that’s why DIY pressure washing leaves “tiger stripes” on concrete so often.
Final Thoughts
Pressure washing looks simple. It isn’t.
Concrete reacts to force differently across its surface. Slight variations become visible lines. Consumer equipment amplifies the risk. Skipping chemistry makes it worse. Technique errors compound quickly.
I’m not saying DIY is impossible. I’m saying it requires more precision than most people expect.
Because once those stripes appear, fixing them is harder than preventing them.
And prevention always costs less.
If your driveway is already striped, approach correction carefully. Uniformity is the goal. Aggression is not.
That’s the difference between cleaning and damage.
And that’s the real story behind why DIY pressure washing leaves “tiger stripes” on concrete.
Frequently Asked Questions (FAQs)
Tiger stripes are visible streaks or uneven lines left behind after pressure washing due to inconsistent cleaning.
Striping usually happens from uneven wand movement, incorrect nozzle choice, or skipping proper pre-treatment.
No, once the surface dries, the streaks remain unless the slab is re-cleaned uniformly.
No, higher PSI often makes striping worse by increasing the risk of etching and uneven cleaning.
If they’re caused by dirt imbalance, they can sometimes be corrected; if caused by etching, the damage may be permanent.
Yes, rotary surface cleaners significantly reduce striping by creating consistent, overlapping spray patterns.
Wet concrete hides contrast; once dry, color variations become more noticeable.
Yes, cold water may struggle with oil and embedded grime, leading to uneven stain removal.
Spot cleaning usually makes it worse; the entire slab must be cleaned evenly for consistent results.
Yes, detergents break down organic buildup so pressure can rinse evenly instead of creating streaks.


